 Call (707) 463-1322 to order any Factory Pipe ® product.
 - Products
- Yamaha
- Accessories
- Go-Ped
Easy Does It
Factory Pipe Spec II And Evolution Marine Flame Arrestor Install
By Dan Fitzgerald
One of the several PWC on the market today is the Sea-Doo XP800. It accelerates very well and runs, stock out of the box, over 55 mph. This may seem fast, but to many owners stock performance is never enough. The quest for speed is endless and many are willing to sacrifice reliability for the extra power, but this doesn't have to be a give and take situation.
The Factory Pipe Spec II, in combination with the Evolution Marine flame arrestor, are two parts that have been race proven and perform extremely well on an otherwise stock craft. This combination turns an otherwise good running XP800 into a real fire breather. Acceleration improvement is substantial and top speed rivals many full-blown race PWC. The good news is that the terms "reliable" and "extra power" need not be mutually exclusive if these parts are bolted on correctly. The majority of aftermarket parts available today are designed pretty well and will perform as promised if they are installed and tuned according to the directions. The problem is that the directions to these parts are often ignored and problems later arise because of installer error. Some of these parts end up with an undeserved bad rap. People will often complain about anything, but most of the time any problem arising out of an aftermarket part is the fault of the guy complaining.
The directions that are supplied with most aftermarket parts vary in difficulty. Some are pretty basic, i.e., the Evolution Marine flame arrestor, and can be followed with ease while others are more difficult and require some thought. The instructions for the Factory Pipe installation are on the more difficult side, mainly because there are no pictures to study. Even without the pictures, these instructions can still be used effectively if you stick to some basic steps.
The instructions for almost anything including those from Factory Pipe and Evolution Marine, come with a bill of materials. This is usually the ignored portion of the instructions but is often the most important. If a single part is missing from your kit, it's better to find out about it before you actually start installing.
The easiest way to go though a bill of materials is by laying out all the parts and checking off each item on the list. This also provides a great way to familiarize yourself with the components that will be referred to later in the instructions by their name or a simple description. After verifying that all the parts are included, you may get ready to start the installation process.
The Factory Pipe instructions come with several warnings. These are very critical relating to the life of your engine and should not be ignored. The majority of aftermarket parts available today are extensively tested by their manufacture. In this testing process, a determination is made of how to maximize the performance of these individual parts, as is the case with Factory Pipe. To operate properly, the carburetors need to be re-jetted. If this step is ignored, severe engine damage can occur. This step will add about 45 minutes to your installation time but is extremely critical.
|
The following step is the addition of the ECWI unit. It is wired and installed inside the electric box. These directions are pretty straightforward. To correctly set your rev limiter/ECWI module, locate the number on the back of the engine. It is stamped directly into the cases next the engine identification number. Once this located, just follow the Micro Touch directions and note that the decal on the back of the unit is installed right side up in relation to the illustration. After the electronic unit is wired up, it is cased in the original electric box. A suggestion would be to wrap the unit with some mat/wetsuit material so it can't shift position once the box is sealed up.
|
Now is the perfect time to re-jet your carburetors. The Factory Pipe instructions do not come with carburetor jetting instructions, just a recommendation of jetting. If you have never taken apart a Mikuni carburetor, I would suggest getting a manual for reference. The following are a couple of pointers to use assuming a familiarity with these carburetors exists.
The carburetors do not need to be completely removed from the craft to perform the re-jetting task. Just pull out the mounting bolts, remove the choke cable and pull off one side of the throttle link. This step will free up the carburetors enough to place them on the cylinder head (cover for protection) for access. Pull off the diaphragm cover to expose the valve plate. The two Phillips head screws that hold the valve plate are usually locked in extremely tight and are difficult at best to remove. If you use a worn out screwdriver they will definitely strip out. I suggest using a Snap-On #2 screwdriver here. The Snap-On part has an extremely durable head and fits these screws perfectly. If you end up striping the screw out, don't panic; just drill out the head. Once the cover is off, the rest of the screw will come right out with the needle nose pliers. Replacement screws are available at most well equipped shops. Check out the jets, needle & seat, low and high speed screws ,spring and adjust as required. Once that is accomplished, reinstall the carburetors and now you are ready to start installing the pipe.
The exhaust manifold will install with little difficulty but the inside manifold bolts will require some tightening. Take the supplied Allen wrench and shorten the "L" portion to help here. If the gasket tore when the stock exhaust manifold was removed, do not try to reuse it, purchase a new one. Make sure to apply medium strength thread sealant, such as Loctite, to the bolts and torque to 30 lbs.
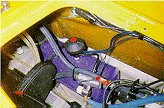
 One of the first stages of the XP800 Factory Pipe install is the tail cone portion. It is a tight fit and will require a little patience andmaneuvering to get it just right. |
The chamber will seem like it won't fit in the hull. Just maneuver it around a bit and it will slide right into place. The best way to get the pipe couplers on is with a little Windex/glass cleaner sprayed on their surfaces. Do not use any spray lubricant here. Spray lubricants will leave these surfaces too oily and the pipe coupler will not hold properly, which will result in the pipe falling off while the engine is operating.
The headpipe will install with little difficulty. Make sure the blue 5-1/2" coupler is seated against both the chamber and head pipe rings before you tighten the clamps. This is basically installed but this is not the most difficult portion of the process.
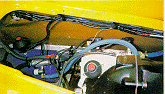 Routing the 1/4" hose from headpipe sprayer to the regulator along the stock wire loom is a deviation from the instructions. This will not change performance and seems to be the cleanest, most out of the way set up. |
The installation of the water lines on the Factory Pipe Spec II pipe are critical. If the bill of materials list was lightly studied from the beginning, the waterline installation process will be understandable. The 3/8" hose that routs from the headpipe flange to the ECWI solenoid is a tuned length and must not be changed. The directions call for installation of supplied 1/4"x 35" hose from the front of the head pipe over the cylinder head to the upper nipple on the pressure regulator. I thought his direction was not the best way to route this hose so it was replaced with a slightly longer hose.
We routed it around the front of the headpipe and along the left upper side of the hull in with the three stock harness retainers. This seemed to be much cleaner and out of the way. At this point you are basically done with the pipe installation and are ready to mount the flame arrestor.
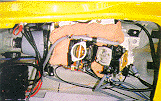
The Evolution Marine flame arrestor is a large unit but installs fairly quickly. The directions for installation are direct and to the point. A good issue with this part is that it makes use of the stock flame arrestor base and support bracket, this is great for reliability. The top portion of the flame arrestor is very close to the hull making it virtually impossible to access with a socket wrench. A little patience is required here because an open-end wrench will have to be used in 1/4 to ½-turn increments. Once installed, it's a very clean looking unit.
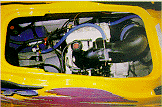 Tada! The project is complete and ready for on the water testing! Be sure to go over every screw and hose clamp after 5 minutes of running the engine. |
Once you are at the point of completion go back over every hose clamp, connection and bolt. If everything looks tight, fire up the craft and look for any fuel or exhaust leaks. It is best if you can run the craft for about 5 minutes on a flush hose, checking all connections while the craft is running. If all looks good, shut the craft off and let it cool. Go over all the hardware again, the gaskets, clamps, etc. They will settle and require retightening and/or retorquing. A good race trick is actually applying red Loctite to all the hose clamps on the screw portion, this will keep the clamp locked in place. With everything holding, now it's time to head for the water.
 |
 |
 |
 |
The Factory Pipe system can be adjusted by moving the red adjuster on the top of the water box regulator. This makes a difference in acceleration and top end. A digital tachometer is a great tool to use in tuning the pipe and is suggested. After the carbs are adjusted to the best Performance, take a look at your spark plugs. The plugs should be light brown in color. Once this has been achieved, then you have basically completed the project.
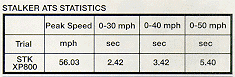
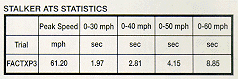
The Sea-Doo XP800 with the addition of the Factory Pipe Spec II pipe system and The Evolution Marine flame arrestor is an outstanding performer and should maintain good reliability with proper maintenance. The performance gain can be seen on the Stalker ATS graphs which list an impressive improvement, but the real gain is in the sheer thrill factor the first time you pin the throttle. It's no wonder that the majority of the Sea-Doo race teams are using this exhaust system on their "works" boats.***
Tel: 707-463-1322, Fax: 707-463-1384, E-mail: Click here